

Specialized in Geotechnical Works
Micro Piling, Soil Nailing, Guniting, Ground Anchor & Underpinning.

Facing a unique geotechnical challenge?
Contact us today to discuss your project and explore how we can provide effective, innovative solutions tailored to your needs.
Facing a unique geotechnical challenge?
Contact us today to discuss your project and explore how we can provide effective, innovative solutions tailored to your needs.
Facing a unique geotechnical challenge?
Contact us today to discuss your project and explore how we can provide effective, innovative solutions tailored to your needs.
Facing a unique geotechnical challenge?
Contact us today to discuss your project and explore how we can provide effective, innovative solutions tailored to your needs.
About Us
At Uni Excel Engineering Sdn Bhd (Micropile Contractor), we specialize in installing high capacity micropiles, even in the most challenging environments.
Our expertise allows us to tackle unique geotechnical problems across a variety of geological formations.
CORE SERVICES
Micropile Installation
We drill and install micropiles in any geological formation, including advanced rock socketing techniques. Our solutions are designed for maximum load-bearing capacity in confined and difficult locations.
Underpinning
We provide underpinning services to prevent and arrest settlement in completed buildings. Our tailored solutions ensure structural integrity and safety.
Slope Stabilization
Our soil nailing techniques effectively stabilize hillslopes, preventing sliding and erosion. We address both aesthetic and structural concerns with minimal disruption.
Ground Strengthening
We utilize various grouting methods to strengthen soft and problematic ground, enhancing stability for new construction and existing structures.

Why Choose Us?
- Expertise in Difficult Sites:
Our extensive experience and specialized equipment allow us to navigate challenging conditions seamlessly. - Tailored Solutions:
We understand that no two projects are the same. We work closely with clients to develop customized approaches that meet their specific requirements. - Advanced Equipment:
With a diverse range of drilling machines, we can adapt our methods to suit any project environment.
Our services
MICROPILES CONTRACTOR
What are micropiles?
Micropiles are small-diameter, high-capacity piles used to support structures, often in challenging soil conditions. They are particularly useful for retrofitting existing foundations, in tight spaces, or in areas with limited access.
Micropiles, also known as mini-piles or pin piles, are small-diameter (typically less than 300 mm) drilled and grouted replacement piles that can carry high loads despite their size. They have several advantages over traditional foundations, particularly in specific site conditions or constraints.
Below are the main advantages of micropiles compared to traditional foundations:
- Ability to Work in Restricted Spaces
- Limited Access Areas:
Micropiles can be installed in confined or limited-access areas, such as basements, urban settings, or inside existing structures. Their small size and the flexibility of installation equipment make them ideal for sites where large traditional pile driving machinery can’t fit. - Low Headroom Requirements:
Micropile equipment can operate in areas with low headroom, such as beneath bridges, in tunnels, or in existing buildings with low ceilings.
- Minimal Vibration and Noise
- Reduced Disturbance:
Unlike traditional driven piles or large-diameter bored piles, micropiles are drilled rather than hammered into the ground. This minimizes vibrations and noise, making them ideal for use in urban or sensitive environments, close to existing structures or historical buildings. - Less Disruptive to Surroundings:
Micropile installation typically causes less disruption to surrounding infrastructure, utilities, and residents.
- Adaptability to Various Soil and Ground Conditions
- Challenging Soil Conditions:
Micropiles are versatile and can be installed in a wide variety of ground conditions, including soft soil, loose sand, or highly fractured rock. They can penetrate obstructions like boulders and dense gravel, which may be difficult for traditional foundations. - Excellent for Weak Soils: Micropiles can provide high load capacity in areas with weak soil or where traditional foundations would require significant modifications or deep excavation.
- High Load-Bearing Capacity
- Capacity in Compression and Tension:
Despite their small diameter, micropiles can support heavy loads (up to several hundred tons) because they rely on both friction and end-bearing to transfer loads to stronger, deeper soil layers. - Performance Under Lateral Loads:
Micropiles can also be grouped together to resist lateral loads and moments, which is advantageous in seismic or wind-prone regions.
- Ease of Installation
- Fast and Flexible Installation: Micropiles are typically faster to install than traditional deep foundation systems. They are particularly useful in projects with tight schedules or where rapid mobilization and demobilization are required.
- Minimal Excavation Required: The need for extensive excavation is reduced with micropiles, as they are drilled directly into the ground. This also reduces disposal of excess soil.
- Compatibility with Existing Structures
- Retrofit and Repair Applications:
Micropiles can be installed to strengthen or stabilize existing structures without needing major modifications. This makes them ideal for foundation underpinning, seismic retrofits, or reinforcing buildings and bridges. - Minimally Invasive to Existing Foundations:
They can be installed adjacent to existing foundations without damaging or undermining them, which is not always possible with traditional methods.
- Suitability for Areas with Difficult Access
- Installation in Remote Locations:
Micropile equipment is more portable and can be used in remote or hard-to-reach areas where traditional foundation equipment would be too large or cumbersome to transport. - Small Footprint on Site:
The installation process requires minimal space, which reduces the impact on the surrounding environment or existing infrastructure.
- Cost-Effectiveness
- Reduced Material and Transportation Costs:
Micropiles generally use less material (steel and concrete) than traditional foundations, which can reduce overall material costs, especially in locations where large-scale construction material transport is difficult or costly. - Less Labor-Intensive:
The installation process requires fewer workers and less equipment, reducing labor costs and on-site management efforts.
- Superior Seismic Performance
- Resilience in Seismic Areas:
Micropiles have been shown to perform well in seismic zones due to their ability to absorb dynamic loads and accommodate ground movement. This flexibility makes them a popular choice in earthquake-prone areas. - Resistance to Liquefaction:
In areas with loose, saturated soils prone to liquefaction, micropiles can help stabilize structures by transferring loads to more competent soils or rock layers.
- Environmental Benefits
- Minimal Ground Disturbance:
The smaller size of micropiles and their installation process results in less ground disturbance, making them a more environmentally friendly option in sensitive ecological zones. - Reduced Footprint and Carbon Emissions:
Compared to traditional deep foundation systems, the smaller equipment and materials required for micropile installation can result in lower carbon emissions.
Key Takeaways:
- Micropiles are ideal for challenging site conditions, restricted spaces, and sensitive environments where traditional foundations may struggle or be too disruptive.
- They provide high load-bearing capacity despite their small size and are suitable for use in a variety of soil conditions, making them highly adaptable.
- Ease of installation, low disturbance, and cost-efficiency make micropiles a popular choice for both new constructions and retrofitting existing structures.
Their versatility and effectiveness make micropiles a modern, efficient solution in many foundation engineering applications.
SOIL NAILING CONTRACTOR
What is soil nailing?
Soil nailing is an in-situ earth retention technique used to stabilize slopes, embankments, and retaining walls by inserting reinforcement elements (typically steel bars) into the ground. These bars, or “nails,” are drilled into the soil at regular intervals and then grouted in place to enhance the soil’s shear strength. The technique is especially useful for stabilizing loose or weak soil conditions.
Key Applications of Soil Nailing:
- Slope Stabilization
- Preventing Landslides and Erosion:
Soil nailing is widely used to stabilize slopes that are at risk of failure, landslides, or soil erosion. By reinforcing the soil mass, it increases the slope’s overall stability. - Temporary or Permanent Stabilization:
In road construction or hillside developments, soil nailing can be applied as a temporary solution during excavation or as a permanent reinforcement for long-term slope stabilization.
- Retaining Walls
- Excavation Support:
Soil nailing can act as a substitute for traditional retaining walls during the excavation process for foundations, tunnels, or basements. It is often used when vertical cuts need support in a construction zone. - Deep Excavation:
In urban environments, where space is limited and deep excavations are necessary, soil nailing can create a retaining structure that allows for vertical cuts to be made safely. - Cost-Effective Alternative:
It can be more economical than traditional methods like soldier pile and lagging walls or sheet piling, particularly for deeper excavations or where space is restricted.
- Underground Structures
- Tunnel Portals:
Soil nailing is used to reinforce the entrances of tunnels, known as tunnel portals, where the ground may need additional support during excavation. The technique helps stabilize the surrounding soil and prevent collapse. - Underground Stations or Parking Garages:
In the construction of underground transportation systems or parking garages, soil nailing provides necessary support for deep excavations, maintaining the integrity of the surrounding soil.
- Roadway and Highway Cuts
- Steep Road Embankments:
On highways or roadways that cut through hillsides or steep terrain, soil nailing provides lateral support to prevent the embankment from sliding or collapsing onto the roadway. This is critical for ensuring safe passage on high-risk routes. - Widening Existing Roads:
When existing roadways need to be widened and there is no room for traditional retaining structures, soil nailing can stabilize adjacent slopes without requiring additional land space.
- Seismic Retrofits
- Earthquake-Prone Areas:
In areas that are prone to seismic activity, soil nailing is used to reinforce slopes or retaining walls to ensure they remain stable during an earthquake. The nails help absorb and distribute the forces generated by ground movement.
- Temporary Shoring for Construction
- Support During Excavation:
In construction, soil nailing is commonly used as temporary shoring to provide lateral support for excavations. It allows contractors to dig deep foundations or basements without the risk of soil collapse. - High-Rise Buildings or Large Projects:
For large-scale urban projects where deep excavation is required, soil nailing enables construction teams to work in confined spaces without needing to construct traditional retaining walls.
- Stabilizing Bridge Abutments
- Bridge Approach Slopes:
Soil nailing is employed to stabilize the approach slopes of bridge abutments, which are prone to instability due to traffic loads and environmental factors like rainfall or river flow. - Minimizing Erosion Around Abutments:
It helps to prevent erosion around bridge supports, particularly in areas where water or weather conditions might weaken the surrounding soil.
- Mine and Quarry Stabilization
- Supporting Open Pit Mines:
In open pit mines and quarries, soil nailing provides stabilization of steep, unstable slopes, allowing safe access for ongoing excavation activities. - Mining Tunnels:
In underground mining operations, soil nailing is often used to stabilize the roof and walls of tunnels and shafts to prevent collapse.
- Support for Aging Infrastructure
- Rehabilitation of Existing Retaining Walls:
Soil nailing can be used to retrofit and stabilize old or deteriorating retaining walls that are at risk of failure. This is especially beneficial in urban settings where completely replacing a wall would be costly or impractical. - Infrastructure Repair:
It is often used to repair embankments, retaining structures, or slopes along railways, highways, and other critical infrastructure systems.
Advantages of Soil Nailing:
- Cost-Effective:
Soil nailing is often more economical than traditional retaining wall construction, particularly in difficult or steep terrain. - Flexibility:
It can be applied in a wide variety of ground conditions, including soft soil, loose gravel, or weathered rock. - Minimal Disruption:
The installation process causes minimal disturbance to the existing ground and surrounding structures, making it ideal for use in urban environments or near sensitive infrastructure. - Fast Installation:
The drilling and grouting process is relatively quick, especially compared to other earth retention methods. - No Need for Large Excavations:
Soil nailing typically requires minimal excavation, reducing the time and costs associated with earthmoving.
How Soil Nailing Works:
- Drilling Holes:
Holes are drilled into the soil at predetermined angles and depths, based on the engineering design. - Inserting Nails:
Steel bars, or nails, are inserted into the drilled holes. The bars are often corrosion-resistant to ensure longevity. - Grouting:
The nails are grouted in place, bonding them to the surrounding soil and increasing the overall shear strength of the slope or wall. - Facing Application:
A facing material, such as shotcrete, concrete panels, or wire mesh, is typically applied to the exposed soil surface. This facing helps prevent erosion and increases the system’s stability.
Summary:
Soil nailing is a versatile, cost-effective solution for stabilizing steep slopes, retaining walls, and excavation sites. It is especially useful for infrastructure projects where space is constrained or where traditional support methods would be too disruptive or costly. Soil nailing has proven effective in various applications, from road embankments to tunnel portals, and provides both temporary and permanent stabilization solutions.
GUNITING CONTRACTOR
What is guniting?
Guniting, also known as shotcreting, is a construction technique in which a mixture of cement, sand, and water (concrete or mortar) is pneumatically projected at high velocity onto a surface to form a dense, compacted layer. The technique is used primarily for lining, repair, and reinforcement in construction and civil engineering projects.
There are two main types of guniting processes:
- Dry-Mix Process (Traditional Guniting)
- In the dry-mix guniting method, dry cement and sand are mixed and fed into a hopper. The mixture is then conveyed through a hose using compressed air. Water is added at the nozzle just before the material is sprayed onto the surface.
- This process allows for greater control over the water-cement ratio, making it ideal for applications requiring precise material placement and adjustment on-site.
- Wet-Mix Process (Shotcreting)
- In the wet-mix shotcrete process, the cement, sand, aggregates, and water are pre-mixed to form a concrete or mortar mixture. This wet mixture is then pumped through a hose and sprayed onto the surface using compressed air.
- The wet-mix process typically allows for faster application and greater production rates, as the material is already hydrated before being projected onto the surface.
Key Applications of Guniting
- Slope Stabilization and Retaining Walls
- Erosion Control: Guniting is commonly used to stabilize slopes and prevent erosion by creating a hard, durable surface that protects the soil beneath. The shotcrete forms a protective shell, ensuring the slope remains intact during heavy rains or landslides.
- Slope Reinforcement: It is often combined with soil nailing, where nails are inserted into a slope, and the guniting layer is sprayed over the surface to create a solid reinforced structure.
- Repair of Concrete Structures
- Restoration of Damaged Concrete: Guniting is widely used to repair and restore damaged or deteriorated concrete structures such as bridges, tunnels, dams, and retaining walls. It helps fill cracks, holes, or weakened areas, restoring the integrity of the structure.
- Strengthening: Guniting can be applied as an additional layer to strengthen existing concrete structures, providing extra protection from wear, weathering, or seismic activity.
- Tunnel Lining
- Tunnel Support: During tunnel excavation, guniting is often used to stabilize and reinforce the tunnel walls, providing immediate support to prevent collapse. The shotcrete layer forms a protective shell that holds the ground in place.
- Permanent Lining: Guniting can be used as a permanent lining for tunnels, offering a durable and smooth surface that resists water ingress and enhances the overall strength of the tunnel structure.
- Swimming Pool Construction
- Shaping Pool Shells: Guniting is a popular method for shaping swimming pools. The high-pressure application allows for the creation of custom-designed pool shapes, including curves, slopes, and steps. Once applied, the shotcrete forms the pool’s structural shell, which can be finished with plaster or tiles.
- Durable Construction: The dense, compacted nature of the guniting process makes swimming pools more durable and resistant to leaks or structural failure over time.
- Dams and Reservoirs
- Waterproofing: Guniting is used to apply protective linings to dams, reservoirs, and water-retaining structures. It creates a water-resistant barrier that prevents leaks and seepage, improving the durability and lifespan of the structure.
- Repair and Reinforcement: In addition to new construction, guniting is applied to repair cracks or deteriorated sections of existing water-retaining structures.
- Structural Repair in Buildings
- Facade Restoration: In buildings, guniting can be used to restore and repair deteriorating facades or cladding. It is especially useful for covering uneven surfaces, filling in gaps, or repairing external structural damage.
- Foundation Repair: Guniting is also used to reinforce and repair weakened foundations or basement walls, adding strength to the building’s structural core.
- Fireproofing and Thermal Protection
- Fire Protection: Guniting can be used to apply fireproof coatings to steel or concrete structures, providing additional fire resistance. The shotcrete forms a thermal barrier that can help protect the underlying structure from extreme temperatures in the event of a fire.
- Thermal Insulation: Guniting is sometimes used to apply thermal insulation layers to industrial furnaces, chimneys, or kilns to improve heat retention and energy efficiency.
Advantages of Guniting
- High Bond Strength
The high-velocity application of gunite ensures a strong bond between the shotcrete and the surface, making it ideal for applications requiring tight adhesion and durability.
- Dense, Impermeable Surface
The force of application compacts the material, creating a dense, impermeable surface that resists water infiltration and weathering. This makes guniting particularly effective for waterproofing applications, such as in tunnels, pools, and water-retaining structures.
- Flexibility in Application
Guniting can be applied to complex shapes, vertical surfaces, overhead areas, and confined spaces. It provides greater flexibility than traditional casting or formwork methods, especially in projects requiring custom shapes or difficult-to-reach areas.
- Rapid Application
Guniting is faster than traditional concrete pouring methods, as the material is applied directly to the surface without the need for formwork. This saves time, reduces labor costs, and is especially useful in large-scale or time-sensitive projects.
- Minimal Formwork
In many cases, guniting requires little to no formwork, as the material is sprayed directly onto the surface. This reduces construction costs, simplifies project logistics, and speeds up the overall construction process.
- Versatility
Guniting can be used for both new construction and repair or retrofit projects, making it highly versatile for various civil, structural, and architectural applications.
- Durability and Strength
The dense, compacted material produced by guniting is highly durable and provides excellent structural strength. It resists cracking, weathering, and environmental wear, making it suitable for long-lasting infrastructure.
Disadvantages of Guniting
- Skilled Labor Required: The guniting process requires skilled workers to ensure proper mixing, projection, and application techniques. Mistakes during application can result in poor quality or uneven surfaces.
- Potential for Rebound Waste: During application, some material may bounce off the surface (called “rebound”), leading to potential waste if not managed properly.
- Difficult to Control Thickness: Achieving a consistent thickness across a large surface area can be challenging, especially in overhead or vertical applications.
Summary
Guniting (or shotcreting) is an effective construction technique for applying a high-velocity mixture of concrete or mortar onto surfaces to create a dense, durable, and bonded layer. Its primary applications include slope stabilization, tunnel lining, swimming pool construction, and the repair of concrete structures. Guniting is versatile, cost-effective, and allows for rapid application, making it widely used in modern construction and repair projects.
HORIZONTAL DRAINS CONTRACTOR
What are horizontal drains?
Horizontal drains are an effective geotechnical engineering technique used to reduce groundwater pressure (also known as pore water pressure) and improve the stability of slopes, embankments, or other earthen structures. They involve drilling horizontal or slightly inclined holes into a slope or embankment and inserting perforated pipes (or geosynthetic drainage materials) that allow groundwater to flow out, reducing the water table and relieving pressure on the soil.
Key Components of Horizontal Drains
- Drain Pipes:
- Perforated Pipes: These are pipes with holes or slots along their length that allow water to enter the pipe from the surrounding soil and drain out.
- Geotextile Wrapping: Sometimes, the perforated pipe is wrapped with a geotextile fabric to prevent fine soil particles from clogging the pipe while allowing water to pass through.
- Drainage Channels:
- Discharge Point: The water collected by the horizontal drains is directed to a discharge point or drainage system, such as an open channel, culvert, or stormwater system, preventing the accumulation of water behind the slope or structure.
- Drilling Equipment:
- Drilling Rigs: Horizontal drains are typically installed using specialized drilling rigs that can create horizontal or inclined boreholes at the desired depth and angle.
Working Principle of Horizontal Drains
Horizontal drains work by intercepting and draining excess groundwater that builds up in slopes or embankments, which can otherwise weaken the soil and lead to instability or failure (e.g., landslides or slope failures). By lowering the water table and reducing pore water pressure, the effective stress in the soil increases, which enhances its shear strength and stability.
Applications of Horizontal Drains
- Slope Stabilization
- Preventing Landslides: Horizontal drains are frequently used to stabilize natural or man-made slopes that are prone to landslides due to excess groundwater. By draining the water, they prevent slope failures caused by increased pore water pressure during heavy rains or snowmelt.
- Long-Term Slope Stability: They can be part of a permanent solution to maintain slope stability, especially in areas where water tends to accumulate in the subsurface.
- Embankments and Dams
- Stabilizing Earthen Dams and Levees: Horizontal drains are installed in earthen dams and levees to control seepage and prevent water pressure from building up inside the embankment. This minimizes the risk of dam failure or erosion.
- Reducing Piping Risks: By relieving internal water pressure, horizontal drains reduce the risk of soil particles being carried away by water (piping), which can lead to dam failure.
- Highway and Railway Cuttings
- Cut Slope Stabilization: Horizontal drains are often used along highways or railways where cut slopes are created. These artificial slopes can become unstable due to groundwater, so installing horizontal drains helps stabilize the ground and prevent washouts or landslides.
- Preventing Roadway Collapse: By controlling groundwater near road embankments, horizontal drains help prevent the collapse of road surfaces or embankment failures during heavy rainfall.
- Tunnels and Underground Structures
- Tunnel Excavation: Horizontal drains are used during tunnel excavation to reduce groundwater inflow, which could otherwise create dangerous working conditions or cause tunnel collapse.
- Underground Structures: Horizontal drains help manage groundwater levels around underground structures such as basements, subway stations, or parking garages, preventing water ingress and maintaining the stability of the surrounding soil.
- Landslide Mitigation
- Reducing Risk in Landslide-Prone Areas: In regions prone to landslides, horizontal drains are installed to proactively reduce groundwater buildup and prevent the triggering of landslides during periods of heavy rainfall.
- Construction Dewatering
- Temporary Groundwater Control: Horizontal drains can be used temporarily to control groundwater during construction activities, allowing excavation to proceed safely without the risk of waterlogging or collapse.
Advantages of Horizontal Drains
- Cost-Effective Slope Stabilization:
- Compared to other stabilization methods like retaining walls or soil nailing, horizontal drains are relatively low-cost and easy to install.
- Reduces Groundwater Pressure:
- Horizontal drains effectively lower the water table, reducing pore water pressure and increasing the overall stability of slopes or embankments.
- Non-Intrusive Installation:
- Horizontal drains can be installed with minimal disturbance to the ground surface, making them suitable for use in sensitive areas where excavation or other large-scale interventions are not feasible.
- Effective Long-Term Solution:
- Once installed, horizontal drains can provide long-term stabilization for slopes or embankments, continuously managing groundwater without requiring frequent maintenance.
- Minimizes Surface Water Runoff:
- By capturing and draining subsurface water, horizontal drains help control runoff and erosion on slopes, preventing additional surface destabilization.
Limitations of Horizontal Drains
- Limited to Groundwater Control:
- Horizontal drains are primarily effective in controlling groundwater but may not be suitable for slopes with structural issues unrelated to water pressure (e.g., weak or unstable soil).
- Clogging Risks:
- Over time, perforated pipes can become clogged with soil particles or sediment, reducing their effectiveness unless maintenance or proper filtering measures (such as geotextile wrapping) are used.
- Drainage Relies on Slope:
- For horizontal drains to be effective, the drainage system must have a proper slope or gravity flow to direct water away from the structure. In areas with flat terrain, additional measures may be needed to ensure proper drainage.
- Limited to Permeable Soils:
- Horizontal drains are most effective in soils with sufficient permeability (such as sandy or gravelly soils) where groundwater can flow into the drainage pipes. In highly impermeable soils like clay, their efficiency might be reduced.
Installation Process of Horizontal Drains
- Site Assessment:
- Engineers conduct a geotechnical assessment to determine groundwater conditions, soil type, and the appropriate spacing, angle, and depth of the horizontal drains.
- Drilling:
- Boreholes are drilled horizontally or at a slight incline into the slope or embankment using specialized drilling rigs. The depth and angle depend on the site conditions and design requirements.
- Insertion of Perforated Pipes:
- Perforated pipes or drainage materials are inserted into the drilled holes. If necessary, geotextile fabric is wrapped around the pipes to filter out soil particles.
- Grouting or Backfilling (Optional):
- In some cases, the boreholes may be backfilled with gravel or grouted around the pipes to enhance stability and water flow.
- Connection to Drainage System:
- The horizontal drains are connected to a drainage system or outlet, allowing the collected water to be safely discharged away from the slope or structure.
Summary
Horizontal drains are an effective method for controlling groundwater, reducing pore water pressure, and stabilizing slopes, embankments, tunnels, and other structures. They are widely used in landslide prevention, slope stabilization, and tunnel excavation, offering a cost-effective and long-lasting solution for managing subsurface water. By lowering the water table, they significantly increase soil stability, helping to prevent failures caused by groundwater buildup.
GROUND ANCHORS CONTRACTOR
What are ground anchors?
Ground anchors, also known as earth anchors or rock anchors, are structural elements used to transfer tensile loads from structures to the ground, ensuring stability and support for various types of constructions. These anchors are embedded into the ground and fastened to a structure to resist forces such as uplift, lateral forces, and overturning. Ground anchors are commonly used in applications where retaining walls, slopes, foundations, and towers require additional support.
Components of Ground Anchors
- Tendon or Anchor Rod:
This is the core element that provides the structural strength of the ground anchor. It is usually made of steel and is responsible for transferring the load from the structure to the ground. The tendon can be a solid rod, a stranded cable, or a threaded bar.
- Grouting or Bonding Material:
Grout (typically a cementitious or resin-based material) is used to bond the anchor rod to the surrounding soil or rock, ensuring the transfer of load. This grouted section forms the bond length, which anchors the rod to the ground.
- Anchor Head or Plate:
The anchor head is the exposed part of the ground anchor, where the load is applied to the structure. It consists of an anchor plate, nut, or another load-distribution device that transfers the tensile load to the tendon.
- Free Length:
This is the unbonded portion of the tendon between the anchor head and the bonded section. The free length allows the tendon to elongate slightly under load, providing flexibility and preventing sudden failure.
Types of Ground Anchors
- Grouted Anchors:
These are the most common type of ground anchors. A borehole is drilled into the soil or rock, and the anchor tendon is inserted. The hole is then filled with grout, which hardens to form a strong bond between the tendon and the surrounding material.
- Mechanical Anchors:
Mechanical anchors, also called screw or helical anchors, use mechanical devices like expanding plates or threads that “grip” into the soil or rock when tension is applied. These anchors are typically used for temporary works or where grouting is not feasible.
- Driven Anchors:
In this type, the anchor is driven into the ground using impact tools or vibratory methods. Once in place, the anchor is pulled to engage its end plates or flukes, which lock into the soil, providing resistance to tension.
- Self-Drilling Anchors (SDA):
These anchors are drilled directly into the ground without the need for pre-drilling. The anchor acts as its own drill bit, cutting through soil or rock. Once in place, grout is injected through the hollow core of the anchor to bond it to the surrounding ground.
Applications of Ground Anchors
- Retaining Wall Support:
Ground anchors are frequently used to stabilize retaining walls, especially in deep excavations. The anchors are installed through the wall and extend into the soil or rock behind it, providing additional lateral support and preventing wall failure.
- Slope Stabilization:
In areas with unstable slopes or where landslides are a concern, ground anchors can be installed to hold the slope in place by transferring the load to deeper, more stable soil or rock layers.
- Bridge and Tower Foundations:
Ground anchors are used in the foundations of bridges, transmission towers, and wind turbines to resist uplift forces caused by wind or load shifts. They provide stability to structures that are subject to overturning moments.
- Tunnels and Underground Structures:
During tunnel construction, ground anchors are used to stabilize tunnel portals and prevent collapse. They can also be used to provide reinforcement for underground structures like subway stations and deep basements.
- Marine and Offshore Applications:
In marine environments, ground anchors are used to secure floating structures such as docks, platforms, and buoys. They are also used to anchor offshore wind turbines, where the anchors must resist wave and current forces.
- Temporary Works:
Ground anchors are often used in temporary construction projects, such as during excavation support, where temporary retaining structures or shoring systems need stabilization.
- Foundation Support:
Ground anchors can be used to reinforce foundations, especially in areas with soft soils or where high wind or seismic forces are anticipated. They help to anchor the foundation and resist uplift or horizontal movements.
Working Mechanism of Ground Anchors
- Installation:
- A borehole is drilled into the ground to the required depth.
- The tendon or anchor rod is inserted into the hole. In grouted anchors, the borehole is filled with grout to bond the tendon to the surrounding soil or rock.
- The anchor head is attached to the exposed end of the tendon, and a plate or nut is installed to transfer the load to the structure.
- Tensioning:
- Once the grout has cured and the bond has formed, the ground anchor is tensioned by applying a controlled force to the tendon, pulling the structure toward the anchor head.
- This tension creates a pre-stressed condition in the anchor, which allows it to resist tensile forces immediately.
- Load Transfer:
- Under load (e.g., from soil pressure, wind forces, or seismic activity), the tensile force is transferred from the structure to the anchor tendon.
- The bonded section of the tendon transfers the force to the surrounding soil or rock, resisting the load and stabilizing the structure.
Advantages of Ground Anchors
- Effective Load Transfer:
Ground anchors provide a reliable method for transferring tensile loads to stable ground layers, ensuring the stability of structures even under extreme conditions.
- Cost-Effective:
Compared to large retaining walls or foundation reinforcements, ground anchors are often a more economical solution for stabilizing structures.
- Minimal Disruption:
Ground anchors require less excavation or ground disturbance than other stabilization techniques, making them suitable for use in confined or urban areas.
- Versatile:
Ground anchors can be used in a wide variety of soil and rock conditions and are adaptable for both temporary and permanent applications.
- Improved Safety:
Ground anchors increase the stability of slopes, walls, and structures, reducing the risk of collapse or failure, especially in critical infrastructure like bridges and tunnels.
Disadvantages of Ground Anchors
- Complex Installation:
Ground anchors require specialized equipment and skilled labor for installation, especially in difficult ground conditions or hard rock environments.
- Corrosion:
Steel tendons are susceptible to corrosion over time, particularly in wet or aggressive soil conditions. Proper corrosion protection, such as galvanization or encasing the anchor in protective coatings, is required.
- Long-Term Maintenance:
In permanent installations, ground anchors may require inspection and maintenance to ensure their long-term effectiveness. If not maintained, they can lose their load-bearing capacity over time.
- Limited by Ground Conditions:
The effectiveness of ground anchors depends on the surrounding soil or rock. In weak soils or highly fractured rock, anchors may not perform as well without additional grouting or reinforcement.
Summary
Ground anchors are essential tools for providing stability and support in a wide range of construction and civil engineering applications. By transferring tensile loads to deeper, more stable soil or rock layers, they help stabilize retaining walls, slopes, foundations, and other structures. Ground anchors offer a cost-effective, reliable solution for resisting uplift, lateral forces, and overturning, making them crucial for both temporary and permanent structural stability.
GROUTING CONTRACTOR
What is grouting?
Grouting is a construction process in which a fluid material, usually a mixture of cement, water, and other additives, is injected into the ground, voids, or cracks in soil, rock, or structures to improve strength, reduce permeability, and stabilize them. It is commonly used in geotechnical engineering, tunneling, and foundation work, as well as for sealing and waterproofing.
Types of Grouting
- Cement Grouting
- Material: A mixture of cement and water, sometimes with additives to enhance flowability or strength.
- Application: Cement grouting is used to fill voids, cracks, or fractures in soil or rock. It is also used to strengthen or stabilize foundations, prevent water ingress in tunnels, and solidify soil for excavation support.
- Mechanism: The cement slurry is injected under pressure into the ground or structure, where it solidifies and binds loose materials together, filling gaps and increasing load-bearing capacity.
- Chemical Grouting
- Material: Chemicals such as sodium silicate, acrylates, or polyurethanes, mixed with water to form a low-viscosity fluid.
- Application: Chemical grouting is used for soil stabilization, especially in loose, granular soils where cement grouting may not penetrate well. It can also be used to stop water flow in cracks or porous materials.
- Mechanism: The chemicals react in the ground, forming a gel or solid that binds soil particles together or seals cracks, creating an impermeable barrier.
- Bentonite Grouting
- Material: Bentonite clay mixed with water, often used as a slurry.
- Application: Bentonite grouting is used for sealing wells, boreholes, or underground structures. It is also employed in geothermal energy projects and environmental sealing applications.
- Mechanism: Bentonite swells when in contact with water, creating an impermeable layer that prevents water migration or groundwater contamination.
- Resin Grouting
- Material: Epoxy or polyurethane resins.
- Application: Resin grouting is used for sealing cracks in concrete structures or filling voids in rock and soil where high strength or chemical resistance is required.
- Mechanism: The resin penetrates the crack or void, where it hardens into a strong, durable material that provides both structural reinforcement and sealing.
- Compaction
- Grouting Material: A stiff grout mix of cement, sand, and water.
- Application: Used to increase soil density and improve bearing capacity, particularly for supporting foundations or correcting settlement in loose or unstable soils.
- Mechanism: The grout is injected into the soil at depth, where it compacts and displaces the surrounding soil, increasing its density and strength.
Applications of Grouting
- Soil Stabilization
- Purpose: Grouting is used to improve the strength and stiffness of soils, particularly in loose, weak, or water-saturated soils, to allow for construction or prevent landslides.
- Method:
Cement or chemical grout is injected into the soil, binding particles together and increasing shear strength, allowing for more stable foundations.
- Foundation and Structural Support
- Purpose: Grouting is used to strengthen or repair foundations, particularly where the soil has settled or where existing foundations are weak.
- Method: Grout is injected beneath the foundation or into cracks to fill voids and provide additional support, preventing further settlement or failure.
- Waterproofing
- Purpose: Grouting is used to seal cracks or voids in structures like tunnels, dams, or underground basements to prevent water ingress.
- Method: Chemical or bentonite grouts are injected into the structure or surrounding ground to create a waterproof barrier that stops water from seeping in.
- Tunneling
- Purpose: Grouting is essential in tunneling to control groundwater, strengthen tunnel walls, and reduce the risk of collapse.
- Method: Grout is injected into the surrounding ground before or during tunnel excavation, forming a solidified support structure around the tunnel.
- Crack Repair in Concrete Structures
- Purpose: Grouting is used to repair cracks in concrete buildings, bridges, dams, and other structures, restoring their integrity and preventing further damage.
- Method: Epoxy or polyurethane grouts are injected into cracks, filling them and bonding the concrete together to restore structural strength.
- Sinkhole Mitigation
- Purpose: In areas prone to sinkholes, grouting is used to fill underground cavities and voids to prevent collapse.
- Method: Cement-based grout is injected into the voids beneath the ground, filling the empty spaces and stabilizing the area.
Pile and Anchor Installation
- Purpose: Grouting is often used during the installation of ground anchors and piles to secure them in place and provide additional strength.
- Method: Grout is injected around the pile or anchor, filling the surrounding space and creating a solid bond with the ground.
Grouting Process
- Site Investigation:
– Before grouting begins, engineers assess the site to determine the soil or rock conditions, water content, and the extent of voids or cracks that need to be filled. This step is crucial to selecting the appropriate grouting method and materials.
- Drilling or Excavation:
– Depending on the project, boreholes or injection points are drilled into the ground, the structure, or the foundation at the required depth and spacing.
- Grout Preparation:
– The grout mixture is prepared according to the specifications of the project. The composition of the grout depends on the type of material (cement, chemical, resin, etc.) and the desired properties such as flowability, setting time, or strength.
- Grout Injection:
– Grout is injected under controlled pressure into the ground or structure. The pressure helps the grout penetrate voids, cracks, or soil pores. The pressure is carefully monitored to avoid over-pressurizing, which can cause unwanted fractures or damage.
- Curing and Monitoring:
– Once the grout is injected, it is allowed to cure and harden. The time for curing depends on the type of grout material used. During this phase, the grouting process is monitored to ensure the desired results are achieved.
- Quality Control and Testing:
– After the grout has cured, testing is often carried out to verify the effectiveness of the grouting, such as checking the strength, permeability, or soil compaction levels. If necessary, additional grouting may be performed.
Advantages of Grouting
- Versatility:
– Grouting can be used in a wide range of applications, from soil stabilization to crack repair and waterproofing, making it a highly versatile technique in construction and civil engineering.
- Improves Stability:
– Grouting significantly improves the stability and load-bearing capacity of soils and structures, helping prevent settlement, collapse, or failure.
- Waterproofing:
– Grouting creates an effective barrier against water ingress, preventing water from seeping into underground structures, tunnels, or foundations.
- Cost-Effective Repair:
– Grouting can be a more cost-effective alternative to extensive excavation or foundation replacement when dealing with soil issues or structural damage.
- Minimal Disturbance:
– Grouting requires minimal surface disturbance, which is particularly beneficial in urban or confined areas where large-scale excavation would be disruptive.
- Quick Implementation:
– The grouting process can be relatively quick compared to other construction methods, allowing for faster project completion.
Disadvantages of Grouting
- Difficult to Control in Certain Conditions:
– In certain soils or rock types, controlling the spread and distribution of grout can be difficult, potentially leading to uneven or ineffective results.
- Requires Specialized Equipment and Expertise:
– Grouting requires specialized equipment and skilled labor, particularly for chemical and resin grouting, which can increase project costs.
- Environmental Concerns:
– The use of certain chemicals in grouting can pose environmental risks, especially if not managed properly, as they may contaminate groundwater or surrounding ecosystems.
- Limited by Soil Type:
– Grouting is not effective in all soil conditions, particularly in highly impermeable soils or soils that have very low porosity.
Summary
Grouting is a powerful and versatile technique used in construction for soil stabilization, waterproofing, foundation support, and structural repair. By injecting cement, chemical, resin, or bentonite mixtures into the ground or structures, it can fill voids, strengthen foundations, and seal cracks or water ingress points. Grouting provides significant advantages in terms of strengthening and stabilizing structures with minimal surface disruption, making it essential in geotechnical engineering and construction projects.
SLOPE PROTECTION CONTRACTOR
What is slope protection?
Slope protection is crucial for preventing erosion and maintaining the stability of land.
Here are some strategies you can consider:
- Vegetative Cover:
Planting grass, shrubs, or trees can help stabilize the soil. Their roots bind the soil together and reduce runoff. - Retaining Walls:
Constructing walls using stone, concrete, or timber can provide physical support to prevent soil from sliding. - Terracing:
Creating terraces can reduce the slope’s steepness, slowing water runoff and allowing more water to infiltrate the soil. - Geotextiles:
Using geotextile fabrics can help reinforce soil, allowing for better drainage and reducing erosion. - Drainage Systems:
Installing proper drainage can help manage water flow, preventing excess moisture that can destabilize slopes. - Riprap:
Placing large rocks along the slope can protect against erosion from water flow. - Check Dams:
Small barriers made of rocks or logs can slow down water movement, reducing erosion. - Soil Stabilizers:
Chemical treatments can enhance soil cohesion, making it more resistant to erosion.
Consider the specific conditions of your slope, such as soil type, climate, and vegetation, when choosing the best protection method. If you’re facing significant erosion issues, consulting with a geotechnical engineer or environmental specialist may be beneficial.
Geotechnical slope stability is an important aspect of civil engineering, focusing on the assessment and management of slopes to prevent landslides and erosion.
Here are some key concepts and methods related to geotechnical slope stability:
Key Concepts
- Soil Mechanics:
Understanding the properties of soil, including cohesion, friction angle, and moisture content, is essential for evaluating slope stability. - Slope Geometry:
The angle and height of the slope affect stability. Steeper slopes are generally more prone to failure. - Groundwater Influence:
Water can increase pore pressure within soil, reducing its stability. Analyzing groundwater conditions is crucial. - Loading Conditions:
Additional loads (like buildings or roads) can increase the risk of slope failure. Evaluating these loads is important.
Assessment Methods
- Slope Stability Analysis:
Techniques like the limit equilibrium method, finite element analysis, and the method of slices can be used to assess stability. - Field Investigations:
Conducting soil borings, sampling, and testing can provide valuable data about soil properties. - Monitoring:
Installing inclinometers, piezometers, or surface movement monitoring can help track changes in slope stability over time.
Mitigation Techniques
- Grading:
Reducing the slope angle can improve stability. - Retaining Structures:
Walls or barriers can help hold back soil and prevent sliding. - Drainage Improvements:
Proper drainage systems can help manage water and reduce pressure within the slope. - Soil Reinforcement:
Techniques like soil nails, geogrids, or ground anchors can provide additional support. - Vegetation:
Planting deep-rooted vegetation can help stabilize the soil.
If you’re dealing with a specific slope stability issue, it’s often best to consult with a geotechnical engineer who can provide tailored advice and solutions based on your situation.
What are micropiles?
Micropiles are small-diameter, high-capacity piles used to support structures, often in challenging soil conditions. They are particularly useful for retrofitting existing foundations, in tight spaces, or in areas with limited access.
Micropiles, also known as mini-piles or pin piles, are small-diameter (typically less than 300 mm) drilled and grouted replacement piles that can carry high loads despite their size. They have several advantages over traditional foundations, particularly in specific site conditions or constraints.
Below are the main advantages of micropiles compared to traditional foundations:
- Ability to Work in Restricted Spaces
- Limited Access Areas:
Micropiles can be installed in confined or limited-access areas, such as basements, urban settings, or inside existing structures. Their small size and the flexibility of installation equipment make them ideal for sites where large traditional pile driving machinery can’t fit. - Low Headroom Requirements:
Micropile equipment can operate in areas with low headroom, such as beneath bridges, in tunnels, or in existing buildings with low ceilings.
- Minimal Vibration and Noise
- Reduced Disturbance:
Unlike traditional driven piles or large-diameter bored piles, micropiles are drilled rather than hammered into the ground. This minimizes vibrations and noise, making them ideal for use in urban or sensitive environments, close to existing structures or historical buildings. - Less Disruptive to Surroundings:
Micropile installation typically causes less disruption to surrounding infrastructure, utilities, and residents.
- Adaptability to Various Soil and Ground Conditions
- Challenging Soil Conditions:
Micropiles are versatile and can be installed in a wide variety of ground conditions, including soft soil, loose sand, or highly fractured rock. They can penetrate obstructions like boulders and dense gravel, which may be difficult for traditional foundations. - Excellent for Weak Soils: Micropiles can provide high load capacity in areas with weak soil or where traditional foundations would require significant modifications or deep excavation.
- High Load-Bearing Capacity
- Capacity in Compression and Tension:
Despite their small diameter, micropiles can support heavy loads (up to several hundred tons) because they rely on both friction and end-bearing to transfer loads to stronger, deeper soil layers. - Performance Under Lateral Loads:
Micropiles can also be grouped together to resist lateral loads and moments, which is advantageous in seismic or wind-prone regions.
- Ease of Installation
- Fast and Flexible Installation: Micropiles are typically faster to install than traditional deep foundation systems. They are particularly useful in projects with tight schedules or where rapid mobilization and demobilization are required.
- Minimal Excavation Required: The need for extensive excavation is reduced with micropiles, as they are drilled directly into the ground. This also reduces disposal of excess soil.
- Compatibility with Existing Structures
- Retrofit and Repair Applications:
Micropiles can be installed to strengthen or stabilize existing structures without needing major modifications. This makes them ideal for foundation underpinning, seismic retrofits, or reinforcing buildings and bridges. - Minimally Invasive to Existing Foundations:
They can be installed adjacent to existing foundations without damaging or undermining them, which is not always possible with traditional methods.
- Suitability for Areas with Difficult Access
- Installation in Remote Locations:
Micropile equipment is more portable and can be used in remote or hard-to-reach areas where traditional foundation equipment would be too large or cumbersome to transport. - Small Footprint on Site:
The installation process requires minimal space, which reduces the impact on the surrounding environment or existing infrastructure.
- Cost-Effectiveness
- Reduced Material and Transportation Costs:
Micropiles generally use less material (steel and concrete) than traditional foundations, which can reduce overall material costs, especially in locations where large-scale construction material transport is difficult or costly. - Less Labor-Intensive:
The installation process requires fewer workers and less equipment, reducing labor costs and on-site management efforts.
- Superior Seismic Performance
- Resilience in Seismic Areas:
Micropiles have been shown to perform well in seismic zones due to their ability to absorb dynamic loads and accommodate ground movement. This flexibility makes them a popular choice in earthquake-prone areas. - Resistance to Liquefaction:
In areas with loose, saturated soils prone to liquefaction, micropiles can help stabilize structures by transferring loads to more competent soils or rock layers.
- Environmental Benefits
- Minimal Ground Disturbance:
The smaller size of micropiles and their installation process results in less ground disturbance, making them a more environmentally friendly option in sensitive ecological zones. - Reduced Footprint and Carbon Emissions:
Compared to traditional deep foundation systems, the smaller equipment and materials required for micropile installation can result in lower carbon emissions.
Key Takeaways:
- Micropiles are ideal for challenging site conditions, restricted spaces, and sensitive environments where traditional foundations may struggle or be too disruptive.
- They provide high load-bearing capacity despite their small size and are suitable for use in a variety of soil conditions, making them highly adaptable.
- Ease of installation, low disturbance, and cost-efficiency make micropiles a popular choice for both new constructions and retrofitting existing structures.
Their versatility and effectiveness make micropiles a modern, efficient solution in many foundation engineering applications.
What is soil nailing?
Soil nailing is an in-situ earth retention technique used to stabilize slopes, embankments, and retaining walls by inserting reinforcement elements (typically steel bars) into the ground. These bars, or “nails,” are drilled into the soil at regular intervals and then grouted in place to enhance the soil’s shear strength. The technique is especially useful for stabilizing loose or weak soil conditions.
Key Applications of Soil Nailing:
- Slope Stabilization
- Preventing Landslides and Erosion:
Soil nailing is widely used to stabilize slopes that are at risk of failure, landslides, or soil erosion. By reinforcing the soil mass, it increases the slope’s overall stability. - Temporary or Permanent Stabilization:
In road construction or hillside developments, soil nailing can be applied as a temporary solution during excavation or as a permanent reinforcement for long-term slope stabilization.
- Retaining Walls
- Excavation Support:
Soil nailing can act as a substitute for traditional retaining walls during the excavation process for foundations, tunnels, or basements. It is often used when vertical cuts need support in a construction zone. - Deep Excavation:
In urban environments, where space is limited and deep excavations are necessary, soil nailing can create a retaining structure that allows for vertical cuts to be made safely. - Cost-Effective Alternative:
It can be more economical than traditional methods like soldier pile and lagging walls or sheet piling, particularly for deeper excavations or where space is restricted.
- Underground Structures
- Tunnel Portals:
Soil nailing is used to reinforce the entrances of tunnels, known as tunnel portals, where the ground may need additional support during excavation. The technique helps stabilize the surrounding soil and prevent collapse. - Underground Stations or Parking Garages:
In the construction of underground transportation systems or parking garages, soil nailing provides necessary support for deep excavations, maintaining the integrity of the surrounding soil.
- Roadway and Highway Cuts
- Steep Road Embankments:
On highways or roadways that cut through hillsides or steep terrain, soil nailing provides lateral support to prevent the embankment from sliding or collapsing onto the roadway. This is critical for ensuring safe passage on high-risk routes. - Widening Existing Roads:
When existing roadways need to be widened and there is no room for traditional retaining structures, soil nailing can stabilize adjacent slopes without requiring additional land space.
- Seismic Retrofits
- Earthquake-Prone Areas:
In areas that are prone to seismic activity, soil nailing is used to reinforce slopes or retaining walls to ensure they remain stable during an earthquake. The nails help absorb and distribute the forces generated by ground movement.
- Temporary Shoring for Construction
- Support During Excavation:
In construction, soil nailing is commonly used as temporary shoring to provide lateral support for excavations. It allows contractors to dig deep foundations or basements without the risk of soil collapse. - High-Rise Buildings or Large Projects:
For large-scale urban projects where deep excavation is required, soil nailing enables construction teams to work in confined spaces without needing to construct traditional retaining walls.
- Stabilizing Bridge Abutments
- Bridge Approach Slopes:
Soil nailing is employed to stabilize the approach slopes of bridge abutments, which are prone to instability due to traffic loads and environmental factors like rainfall or river flow. - Minimizing Erosion Around Abutments:
It helps to prevent erosion around bridge supports, particularly in areas where water or weather conditions might weaken the surrounding soil.
- Mine and Quarry Stabilization
- Supporting Open Pit Mines:
In open pit mines and quarries, soil nailing provides stabilization of steep, unstable slopes, allowing safe access for ongoing excavation activities. - Mining Tunnels:
In underground mining operations, soil nailing is often used to stabilize the roof and walls of tunnels and shafts to prevent collapse.
- Support for Aging Infrastructure
- Rehabilitation of Existing Retaining Walls:
Soil nailing can be used to retrofit and stabilize old or deteriorating retaining walls that are at risk of failure. This is especially beneficial in urban settings where completely replacing a wall would be costly or impractical. - Infrastructure Repair:
It is often used to repair embankments, retaining structures, or slopes along railways, highways, and other critical infrastructure systems.
Advantages of Soil Nailing:
- Cost-Effective:
Soil nailing is often more economical than traditional retaining wall construction, particularly in difficult or steep terrain. - Flexibility:
It can be applied in a wide variety of ground conditions, including soft soil, loose gravel, or weathered rock. - Minimal Disruption:
The installation process causes minimal disturbance to the existing ground and surrounding structures, making it ideal for use in urban environments or near sensitive infrastructure. - Fast Installation:
The drilling and grouting process is relatively quick, especially compared to other earth retention methods. - No Need for Large Excavations:
Soil nailing typically requires minimal excavation, reducing the time and costs associated with earthmoving.
How Soil Nailing Works:
- Drilling Holes:
Holes are drilled into the soil at predetermined angles and depths, based on the engineering design. - Inserting Nails:
Steel bars, or nails, are inserted into the drilled holes. The bars are often corrosion-resistant to ensure longevity. - Grouting:
The nails are grouted in place, bonding them to the surrounding soil and increasing the overall shear strength of the slope or wall. - Facing Application:
A facing material, such as shotcrete, concrete panels, or wire mesh, is typically applied to the exposed soil surface. This facing helps prevent erosion and increases the system’s stability.
Summary:
Soil nailing is a versatile, cost-effective solution for stabilizing steep slopes, retaining walls, and excavation sites. It is especially useful for infrastructure projects where space is constrained or where traditional support methods would be too disruptive or costly. Soil nailing has proven effective in various applications, from road embankments to tunnel portals, and provides both temporary and permanent stabilization solutions.
What is guniting?
Guniting, also known as shotcreting, is a construction technique in which a mixture of cement, sand, and water (concrete or mortar) is pneumatically projected at high velocity onto a surface to form a dense, compacted layer. The technique is used primarily for lining, repair, and reinforcement in construction and civil engineering projects.
There are two main types of guniting processes:
- Dry-Mix Process (Traditional Guniting)
- In the dry-mix guniting method, dry cement and sand are mixed and fed into a hopper. The mixture is then conveyed through a hose using compressed air. Water is added at the nozzle just before the material is sprayed onto the surface.
- This process allows for greater control over the water-cement ratio, making it ideal for applications requiring precise material placement and adjustment on-site.
- Wet-Mix Process (Shotcreting)
- In the wet-mix shotcrete process, the cement, sand, aggregates, and water are pre-mixed to form a concrete or mortar mixture. This wet mixture is then pumped through a hose and sprayed onto the surface using compressed air.
- The wet-mix process typically allows for faster application and greater production rates, as the material is already hydrated before being projected onto the surface.
Key Applications of Guniting
- Slope Stabilization and Retaining Walls
- Erosion Control: Guniting is commonly used to stabilize slopes and prevent erosion by creating a hard, durable surface that protects the soil beneath. The shotcrete forms a protective shell, ensuring the slope remains intact during heavy rains or landslides.
- Slope Reinforcement: It is often combined with soil nailing, where nails are inserted into a slope, and the guniting layer is sprayed over the surface to create a solid reinforced structure.
- Repair of Concrete Structures
- Restoration of Damaged Concrete: Guniting is widely used to repair and restore damaged or deteriorated concrete structures such as bridges, tunnels, dams, and retaining walls. It helps fill cracks, holes, or weakened areas, restoring the integrity of the structure.
- Strengthening: Guniting can be applied as an additional layer to strengthen existing concrete structures, providing extra protection from wear, weathering, or seismic activity.
- Tunnel Lining
- Tunnel Support: During tunnel excavation, guniting is often used to stabilize and reinforce the tunnel walls, providing immediate support to prevent collapse. The shotcrete layer forms a protective shell that holds the ground in place.
- Permanent Lining: Guniting can be used as a permanent lining for tunnels, offering a durable and smooth surface that resists water ingress and enhances the overall strength of the tunnel structure.
- Swimming Pool Construction
- Shaping Pool Shells: Guniting is a popular method for shaping swimming pools. The high-pressure application allows for the creation of custom-designed pool shapes, including curves, slopes, and steps. Once applied, the shotcrete forms the pool’s structural shell, which can be finished with plaster or tiles.
- Durable Construction: The dense, compacted nature of the guniting process makes swimming pools more durable and resistant to leaks or structural failure over time.
- Dams and Reservoirs
- Waterproofing: Guniting is used to apply protective linings to dams, reservoirs, and water-retaining structures. It creates a water-resistant barrier that prevents leaks and seepage, improving the durability and lifespan of the structure.
- Repair and Reinforcement: In addition to new construction, guniting is applied to repair cracks or deteriorated sections of existing water-retaining structures.
- Structural Repair in Buildings
- Facade Restoration: In buildings, guniting can be used to restore and repair deteriorating facades or cladding. It is especially useful for covering uneven surfaces, filling in gaps, or repairing external structural damage.
- Foundation Repair: Guniting is also used to reinforce and repair weakened foundations or basement walls, adding strength to the building’s structural core.
- Fireproofing and Thermal Protection
- Fire Protection: Guniting can be used to apply fireproof coatings to steel or concrete structures, providing additional fire resistance. The shotcrete forms a thermal barrier that can help protect the underlying structure from extreme temperatures in the event of a fire.
- Thermal Insulation: Guniting is sometimes used to apply thermal insulation layers to industrial furnaces, chimneys, or kilns to improve heat retention and energy efficiency.
Advantages of Guniting
- High Bond Strength
The high-velocity application of gunite ensures a strong bond between the shotcrete and the surface, making it ideal for applications requiring tight adhesion and durability.
- Dense, Impermeable Surface
The force of application compacts the material, creating a dense, impermeable surface that resists water infiltration and weathering. This makes guniting particularly effective for waterproofing applications, such as in tunnels, pools, and water-retaining structures.
- Flexibility in Application
Guniting can be applied to complex shapes, vertical surfaces, overhead areas, and confined spaces. It provides greater flexibility than traditional casting or formwork methods, especially in projects requiring custom shapes or difficult-to-reach areas.
- Rapid Application
Guniting is faster than traditional concrete pouring methods, as the material is applied directly to the surface without the need for formwork. This saves time, reduces labor costs, and is especially useful in large-scale or time-sensitive projects.
- Minimal Formwork
In many cases, guniting requires little to no formwork, as the material is sprayed directly onto the surface. This reduces construction costs, simplifies project logistics, and speeds up the overall construction process.
- Versatility
Guniting can be used for both new construction and repair or retrofit projects, making it highly versatile for various civil, structural, and architectural applications.
- Durability and Strength
The dense, compacted material produced by guniting is highly durable and provides excellent structural strength. It resists cracking, weathering, and environmental wear, making it suitable for long-lasting infrastructure.
Disadvantages of Guniting
- Skilled Labor Required: The guniting process requires skilled workers to ensure proper mixing, projection, and application techniques. Mistakes during application can result in poor quality or uneven surfaces.
- Potential for Rebound Waste: During application, some material may bounce off the surface (called “rebound”), leading to potential waste if not managed properly.
- Difficult to Control Thickness: Achieving a consistent thickness across a large surface area can be challenging, especially in overhead or vertical applications.
Summary
Guniting (or shotcreting) is an effective construction technique for applying a high-velocity mixture of concrete or mortar onto surfaces to create a dense, durable, and bonded layer. Its primary applications include slope stabilization, tunnel lining, swimming pool construction, and the repair of concrete structures. Guniting is versatile, cost-effective, and allows for rapid application, making it widely used in modern construction and repair projects.
What are horizontal drains?
Horizontal drains are an effective geotechnical engineering technique used to reduce groundwater pressure (also known as pore water pressure) and improve the stability of slopes, embankments, or other earthen structures. They involve drilling horizontal or slightly inclined holes into a slope or embankment and inserting perforated pipes (or geosynthetic drainage materials) that allow groundwater to flow out, reducing the water table and relieving pressure on the soil.
Key Components of Horizontal Drains
- Drain Pipes:
- Perforated Pipes: These are pipes with holes or slots along their length that allow water to enter the pipe from the surrounding soil and drain out.
- Geotextile Wrapping: Sometimes, the perforated pipe is wrapped with a geotextile fabric to prevent fine soil particles from clogging the pipe while allowing water to pass through.
- Drainage Channels:
- Discharge Point: The water collected by the horizontal drains is directed to a discharge point or drainage system, such as an open channel, culvert, or stormwater system, preventing the accumulation of water behind the slope or structure.
- Drilling Equipment:
- Drilling Rigs: Horizontal drains are typically installed using specialized drilling rigs that can create horizontal or inclined boreholes at the desired depth and angle.
Working Principle of Horizontal Drains
Horizontal drains work by intercepting and draining excess groundwater that builds up in slopes or embankments, which can otherwise weaken the soil and lead to instability or failure (e.g., landslides or slope failures). By lowering the water table and reducing pore water pressure, the effective stress in the soil increases, which enhances its shear strength and stability.
Applications of Horizontal Drains
- Slope Stabilization
- Preventing Landslides: Horizontal drains are frequently used to stabilize natural or man-made slopes that are prone to landslides due to excess groundwater. By draining the water, they prevent slope failures caused by increased pore water pressure during heavy rains or snowmelt.
- Long-Term Slope Stability: They can be part of a permanent solution to maintain slope stability, especially in areas where water tends to accumulate in the subsurface.
- Embankments and Dams
- Stabilizing Earthen Dams and Levees: Horizontal drains are installed in earthen dams and levees to control seepage and prevent water pressure from building up inside the embankment. This minimizes the risk of dam failure or erosion.
- Reducing Piping Risks: By relieving internal water pressure, horizontal drains reduce the risk of soil particles being carried away by water (piping), which can lead to dam failure.
- Highway and Railway Cuttings
- Cut Slope Stabilization: Horizontal drains are often used along highways or railways where cut slopes are created. These artificial slopes can become unstable due to groundwater, so installing horizontal drains helps stabilize the ground and prevent washouts or landslides.
- Preventing Roadway Collapse: By controlling groundwater near road embankments, horizontal drains help prevent the collapse of road surfaces or embankment failures during heavy rainfall.
- Tunnels and Underground Structures
- Tunnel Excavation: Horizontal drains are used during tunnel excavation to reduce groundwater inflow, which could otherwise create dangerous working conditions or cause tunnel collapse.
- Underground Structures: Horizontal drains help manage groundwater levels around underground structures such as basements, subway stations, or parking garages, preventing water ingress and maintaining the stability of the surrounding soil.
- Landslide Mitigation
- Reducing Risk in Landslide-Prone Areas: In regions prone to landslides, horizontal drains are installed to proactively reduce groundwater buildup and prevent the triggering of landslides during periods of heavy rainfall.
- Construction Dewatering
- Temporary Groundwater Control: Horizontal drains can be used temporarily to control groundwater during construction activities, allowing excavation to proceed safely without the risk of waterlogging or collapse.
Advantages of Horizontal Drains
- Cost-Effective Slope Stabilization:
- Compared to other stabilization methods like retaining walls or soil nailing, horizontal drains are relatively low-cost and easy to install.
- Reduces Groundwater Pressure:
- Horizontal drains effectively lower the water table, reducing pore water pressure and increasing the overall stability of slopes or embankments.
- Non-Intrusive Installation:
- Horizontal drains can be installed with minimal disturbance to the ground surface, making them suitable for use in sensitive areas where excavation or other large-scale interventions are not feasible.
- Effective Long-Term Solution:
- Once installed, horizontal drains can provide long-term stabilization for slopes or embankments, continuously managing groundwater without requiring frequent maintenance.
- Minimizes Surface Water Runoff:
- By capturing and draining subsurface water, horizontal drains help control runoff and erosion on slopes, preventing additional surface destabilization.
Limitations of Horizontal Drains
- Limited to Groundwater Control:
- Horizontal drains are primarily effective in controlling groundwater but may not be suitable for slopes with structural issues unrelated to water pressure (e.g., weak or unstable soil).
- Clogging Risks:
- Over time, perforated pipes can become clogged with soil particles or sediment, reducing their effectiveness unless maintenance or proper filtering measures (such as geotextile wrapping) are used.
- Drainage Relies on Slope:
- For horizontal drains to be effective, the drainage system must have a proper slope or gravity flow to direct water away from the structure. In areas with flat terrain, additional measures may be needed to ensure proper drainage.
- Limited to Permeable Soils:
- Horizontal drains are most effective in soils with sufficient permeability (such as sandy or gravelly soils) where groundwater can flow into the drainage pipes. In highly impermeable soils like clay, their efficiency might be reduced.
Installation Process of Horizontal Drains
- Site Assessment:
- Engineers conduct a geotechnical assessment to determine groundwater conditions, soil type, and the appropriate spacing, angle, and depth of the horizontal drains.
- Drilling:
- Boreholes are drilled horizontally or at a slight incline into the slope or embankment using specialized drilling rigs. The depth and angle depend on the site conditions and design requirements.
- Insertion of Perforated Pipes:
- Perforated pipes or drainage materials are inserted into the drilled holes. If necessary, geotextile fabric is wrapped around the pipes to filter out soil particles.
- Grouting or Backfilling (Optional):
- In some cases, the boreholes may be backfilled with gravel or grouted around the pipes to enhance stability and water flow.
- Connection to Drainage System:
- The horizontal drains are connected to a drainage system or outlet, allowing the collected water to be safely discharged away from the slope or structure.
Summary
Horizontal drains are an effective method for controlling groundwater, reducing pore water pressure, and stabilizing slopes, embankments, tunnels, and other structures. They are widely used in landslide prevention, slope stabilization, and tunnel excavation, offering a cost-effective and long-lasting solution for managing subsurface water. By lowering the water table, they significantly increase soil stability, helping to prevent failures caused by groundwater buildup.
What are ground anchors?
Ground anchors, also known as earth anchors or rock anchors, are structural elements used to transfer tensile loads from structures to the ground, ensuring stability and support for various types of constructions. These anchors are embedded into the ground and fastened to a structure to resist forces such as uplift, lateral forces, and overturning. Ground anchors are commonly used in applications where retaining walls, slopes, foundations, and towers require additional support.
Components of Ground Anchors
- Tendon or Anchor Rod:
This is the core element that provides the structural strength of the ground anchor. It is usually made of steel and is responsible for transferring the load from the structure to the ground. The tendon can be a solid rod, a stranded cable, or a threaded bar.
- Grouting or Bonding Material:
Grout (typically a cementitious or resin-based material) is used to bond the anchor rod to the surrounding soil or rock, ensuring the transfer of load. This grouted section forms the bond length, which anchors the rod to the ground.
- Anchor Head or Plate:
The anchor head is the exposed part of the ground anchor, where the load is applied to the structure. It consists of an anchor plate, nut, or another load-distribution device that transfers the tensile load to the tendon.
- Free Length:
This is the unbonded portion of the tendon between the anchor head and the bonded section. The free length allows the tendon to elongate slightly under load, providing flexibility and preventing sudden failure.
Types of Ground Anchors
- Grouted Anchors:
These are the most common type of ground anchors. A borehole is drilled into the soil or rock, and the anchor tendon is inserted. The hole is then filled with grout, which hardens to form a strong bond between the tendon and the surrounding material.
- Mechanical Anchors:
Mechanical anchors, also called screw or helical anchors, use mechanical devices like expanding plates or threads that “grip” into the soil or rock when tension is applied. These anchors are typically used for temporary works or where grouting is not feasible.
- Driven Anchors:
In this type, the anchor is driven into the ground using impact tools or vibratory methods. Once in place, the anchor is pulled to engage its end plates or flukes, which lock into the soil, providing resistance to tension.
- Self-Drilling Anchors (SDA):
These anchors are drilled directly into the ground without the need for pre-drilling. The anchor acts as its own drill bit, cutting through soil or rock. Once in place, grout is injected through the hollow core of the anchor to bond it to the surrounding ground.
Applications of Ground Anchors
- Retaining Wall Support:
Ground anchors are frequently used to stabilize retaining walls, especially in deep excavations. The anchors are installed through the wall and extend into the soil or rock behind it, providing additional lateral support and preventing wall failure.
- Slope Stabilization:
In areas with unstable slopes or where landslides are a concern, ground anchors can be installed to hold the slope in place by transferring the load to deeper, more stable soil or rock layers.
- Bridge and Tower Foundations:
Ground anchors are used in the foundations of bridges, transmission towers, and wind turbines to resist uplift forces caused by wind or load shifts. They provide stability to structures that are subject to overturning moments.
- Tunnels and Underground Structures:
During tunnel construction, ground anchors are used to stabilize tunnel portals and prevent collapse. They can also be used to provide reinforcement for underground structures like subway stations and deep basements.
- Marine and Offshore Applications:
In marine environments, ground anchors are used to secure floating structures such as docks, platforms, and buoys. They are also used to anchor offshore wind turbines, where the anchors must resist wave and current forces.
- Temporary Works:
Ground anchors are often used in temporary construction projects, such as during excavation support, where temporary retaining structures or shoring systems need stabilization.
- Foundation Support:
Ground anchors can be used to reinforce foundations, especially in areas with soft soils or where high wind or seismic forces are anticipated. They help to anchor the foundation and resist uplift or horizontal movements.
Working Mechanism of Ground Anchors
- Installation:
- A borehole is drilled into the ground to the required depth.
- The tendon or anchor rod is inserted into the hole. In grouted anchors, the borehole is filled with grout to bond the tendon to the surrounding soil or rock.
- The anchor head is attached to the exposed end of the tendon, and a plate or nut is installed to transfer the load to the structure.
- Tensioning:
- Once the grout has cured and the bond has formed, the ground anchor is tensioned by applying a controlled force to the tendon, pulling the structure toward the anchor head.
- This tension creates a pre-stressed condition in the anchor, which allows it to resist tensile forces immediately.
- Load Transfer:
- Under load (e.g., from soil pressure, wind forces, or seismic activity), the tensile force is transferred from the structure to the anchor tendon.
- The bonded section of the tendon transfers the force to the surrounding soil or rock, resisting the load and stabilizing the structure.
Advantages of Ground Anchors
- Effective Load Transfer:
Ground anchors provide a reliable method for transferring tensile loads to stable ground layers, ensuring the stability of structures even under extreme conditions.
- Cost-Effective:
Compared to large retaining walls or foundation reinforcements, ground anchors are often a more economical solution for stabilizing structures.
- Minimal Disruption:
Ground anchors require less excavation or ground disturbance than other stabilization techniques, making them suitable for use in confined or urban areas.
- Versatile:
Ground anchors can be used in a wide variety of soil and rock conditions and are adaptable for both temporary and permanent applications.
- Improved Safety:
Ground anchors increase the stability of slopes, walls, and structures, reducing the risk of collapse or failure, especially in critical infrastructure like bridges and tunnels.
Disadvantages of Ground Anchors
- Complex Installation:
Ground anchors require specialized equipment and skilled labor for installation, especially in difficult ground conditions or hard rock environments.
- Corrosion:
Steel tendons are susceptible to corrosion over time, particularly in wet or aggressive soil conditions. Proper corrosion protection, such as galvanization or encasing the anchor in protective coatings, is required.
- Long-Term Maintenance:
In permanent installations, ground anchors may require inspection and maintenance to ensure their long-term effectiveness. If not maintained, they can lose their load-bearing capacity over time.
- Limited by Ground Conditions:
The effectiveness of ground anchors depends on the surrounding soil or rock. In weak soils or highly fractured rock, anchors may not perform as well without additional grouting or reinforcement.
Summary
Ground anchors are essential tools for providing stability and support in a wide range of construction and civil engineering applications. By transferring tensile loads to deeper, more stable soil or rock layers, they help stabilize retaining walls, slopes, foundations, and other structures. Ground anchors offer a cost-effective, reliable solution for resisting uplift, lateral forces, and overturning, making them crucial for both temporary and permanent structural stability.
What is grouting?
Grouting is a construction process in which a fluid material, usually a mixture of cement, water, and other additives, is injected into the ground, voids, or cracks in soil, rock, or structures to improve strength, reduce permeability, and stabilize them. It is commonly used in geotechnical engineering, tunneling, and foundation work, as well as for sealing and waterproofing.
Types of Grouting
- Cement Grouting
- Material: A mixture of cement and water, sometimes with additives to enhance flowability or strength.
- Application: Cement grouting is used to fill voids, cracks, or fractures in soil or rock. It is also used to strengthen or stabilize foundations, prevent water ingress in tunnels, and solidify soil for excavation support.
- Mechanism: The cement slurry is injected under pressure into the ground or structure, where it solidifies and binds loose materials together, filling gaps and increasing load-bearing capacity.
- Chemical Grouting
- Material: Chemicals such as sodium silicate, acrylates, or polyurethanes, mixed with water to form a low-viscosity fluid.
- Application: Chemical grouting is used for soil stabilization, especially in loose, granular soils where cement grouting may not penetrate well. It can also be used to stop water flow in cracks or porous materials.
- Mechanism: The chemicals react in the ground, forming a gel or solid that binds soil particles together or seals cracks, creating an impermeable barrier.
- Bentonite Grouting
- Material: Bentonite clay mixed with water, often used as a slurry.
- Application: Bentonite grouting is used for sealing wells, boreholes, or underground structures. It is also employed in geothermal energy projects and environmental sealing applications.
- Mechanism: Bentonite swells when in contact with water, creating an impermeable layer that prevents water migration or groundwater contamination.
- Resin Grouting
- Material: Epoxy or polyurethane resins.
- Application: Resin grouting is used for sealing cracks in concrete structures or filling voids in rock and soil where high strength or chemical resistance is required.
- Mechanism: The resin penetrates the crack or void, where it hardens into a strong, durable material that provides both structural reinforcement and sealing.
- Compaction
- Grouting Material: A stiff grout mix of cement, sand, and water.
- Application: Used to increase soil density and improve bearing capacity, particularly for supporting foundations or correcting settlement in loose or unstable soils.
- Mechanism: The grout is injected into the soil at depth, where it compacts and displaces the surrounding soil, increasing its density and strength.
Applications of Grouting
- Soil Stabilization
- Purpose: Grouting is used to improve the strength and stiffness of soils, particularly in loose, weak, or water-saturated soils, to allow for construction or prevent landslides.
- Method:
Cement or chemical grout is injected into the soil, binding particles together and increasing shear strength, allowing for more stable foundations.
- Foundation and Structural Support
- Purpose: Grouting is used to strengthen or repair foundations, particularly where the soil has settled or where existing foundations are weak.
- Method: Grout is injected beneath the foundation or into cracks to fill voids and provide additional support, preventing further settlement or failure.
- Waterproofing
- Purpose: Grouting is used to seal cracks or voids in structures like tunnels, dams, or underground basements to prevent water ingress.
- Method: Chemical or bentonite grouts are injected into the structure or surrounding ground to create a waterproof barrier that stops water from seeping in.
- Tunneling
- Purpose: Grouting is essential in tunneling to control groundwater, strengthen tunnel walls, and reduce the risk of collapse.
- Method: Grout is injected into the surrounding ground before or during tunnel excavation, forming a solidified support structure around the tunnel.
- Crack Repair in Concrete Structures
- Purpose: Grouting is used to repair cracks in concrete buildings, bridges, dams, and other structures, restoring their integrity and preventing further damage.
- Method: Epoxy or polyurethane grouts are injected into cracks, filling them and bonding the concrete together to restore structural strength.
- Sinkhole Mitigation
- Purpose: In areas prone to sinkholes, grouting is used to fill underground cavities and voids to prevent collapse.
- Method: Cement-based grout is injected into the voids beneath the ground, filling the empty spaces and stabilizing the area.
Pile and Anchor Installation
- Purpose: Grouting is often used during the installation of ground anchors and piles to secure them in place and provide additional strength.
- Method: Grout is injected around the pile or anchor, filling the surrounding space and creating a solid bond with the ground.
Grouting Process
- Site Investigation:
– Before grouting begins, engineers assess the site to determine the soil or rock conditions, water content, and the extent of voids or cracks that need to be filled. This step is crucial to selecting the appropriate grouting method and materials.
- Drilling or Excavation:
– Depending on the project, boreholes or injection points are drilled into the ground, the structure, or the foundation at the required depth and spacing.
- Grout Preparation:
– The grout mixture is prepared according to the specifications of the project. The composition of the grout depends on the type of material (cement, chemical, resin, etc.) and the desired properties such as flowability, setting time, or strength.
- Grout Injection:
– Grout is injected under controlled pressure into the ground or structure. The pressure helps the grout penetrate voids, cracks, or soil pores. The pressure is carefully monitored to avoid over-pressurizing, which can cause unwanted fractures or damage.
- Curing and Monitoring:
– Once the grout is injected, it is allowed to cure and harden. The time for curing depends on the type of grout material used. During this phase, the grouting process is monitored to ensure the desired results are achieved.
- Quality Control and Testing:
– After the grout has cured, testing is often carried out to verify the effectiveness of the grouting, such as checking the strength, permeability, or soil compaction levels. If necessary, additional grouting may be performed.
Advantages of Grouting
- Versatility:
– Grouting can be used in a wide range of applications, from soil stabilization to crack repair and waterproofing, making it a highly versatile technique in construction and civil engineering.
- Improves Stability:
– Grouting significantly improves the stability and load-bearing capacity of soils and structures, helping prevent settlement, collapse, or failure.
- Waterproofing:
– Grouting creates an effective barrier against water ingress, preventing water from seeping into underground structures, tunnels, or foundations.
- Cost-Effective Repair:
– Grouting can be a more cost-effective alternative to extensive excavation or foundation replacement when dealing with soil issues or structural damage.
- Minimal Disturbance:
– Grouting requires minimal surface disturbance, which is particularly beneficial in urban or confined areas where large-scale excavation would be disruptive.
- Quick Implementation:
– The grouting process can be relatively quick compared to other construction methods, allowing for faster project completion.
Disadvantages of Grouting
- Difficult to Control in Certain Conditions:
– In certain soils or rock types, controlling the spread and distribution of grout can be difficult, potentially leading to uneven or ineffective results.
- Requires Specialized Equipment and Expertise:
– Grouting requires specialized equipment and skilled labor, particularly for chemical and resin grouting, which can increase project costs.
- Environmental Concerns:
– The use of certain chemicals in grouting can pose environmental risks, especially if not managed properly, as they may contaminate groundwater or surrounding ecosystems.
- Limited by Soil Type:
– Grouting is not effective in all soil conditions, particularly in highly impermeable soils or soils that have very low porosity.
Summary
Grouting is a powerful and versatile technique used in construction for soil stabilization, waterproofing, foundation support, and structural repair. By injecting cement, chemical, resin, or bentonite mixtures into the ground or structures, it can fill voids, strengthen foundations, and seal cracks or water ingress points. Grouting provides significant advantages in terms of strengthening and stabilizing structures with minimal surface disruption, making it essential in geotechnical engineering and construction projects.
What is slope protection?
Slope protection is crucial for preventing erosion and maintaining the stability of land.
Here are some strategies you can consider:
- Vegetative Cover:
Planting grass, shrubs, or trees can help stabilize the soil. Their roots bind the soil together and reduce runoff. - Retaining Walls:
Constructing walls using stone, concrete, or timber can provide physical support to prevent soil from sliding. - Terracing:
Creating terraces can reduce the slope’s steepness, slowing water runoff and allowing more water to infiltrate the soil. - Geotextiles:
Using geotextile fabrics can help reinforce soil, allowing for better drainage and reducing erosion. - Drainage Systems:
Installing proper drainage can help manage water flow, preventing excess moisture that can destabilize slopes. - Riprap:
Placing large rocks along the slope can protect against erosion from water flow. - Check Dams:
Small barriers made of rocks or logs can slow down water movement, reducing erosion. - Soil Stabilizers:
Chemical treatments can enhance soil cohesion, making it more resistant to erosion.
Consider the specific conditions of your slope, such as soil type, climate, and vegetation, when choosing the best protection method. If you’re facing significant erosion issues, consulting with a geotechnical engineer or environmental specialist may be beneficial.
Geotechnical slope stability is an important aspect of civil engineering, focusing on the assessment and management of slopes to prevent landslides and erosion.
Here are some key concepts and methods related to geotechnical slope stability:
Key Concepts
- Soil Mechanics:
Understanding the properties of soil, including cohesion, friction angle, and moisture content, is essential for evaluating slope stability. - Slope Geometry:
The angle and height of the slope affect stability. Steeper slopes are generally more prone to failure. - Groundwater Influence:
Water can increase pore pressure within soil, reducing its stability. Analyzing groundwater conditions is crucial. - Loading Conditions:
Additional loads (like buildings or roads) can increase the risk of slope failure. Evaluating these loads is important.
Assessment Methods
- Slope Stability Analysis:
Techniques like the limit equilibrium method, finite element analysis, and the method of slices can be used to assess stability. - Field Investigations:
Conducting soil borings, sampling, and testing can provide valuable data about soil properties. - Monitoring:
Installing inclinometers, piezometers, or surface movement monitoring can help track changes in slope stability over time.
Mitigation Techniques
- Grading:
Reducing the slope angle can improve stability. - Retaining Structures:
Walls or barriers can help hold back soil and prevent sliding. - Drainage Improvements:
Proper drainage systems can help manage water and reduce pressure within the slope. - Soil Reinforcement:
Techniques like soil nails, geogrids, or ground anchors can provide additional support. - Vegetation:
Planting deep-rooted vegetation can help stabilize the soil.
If you’re dealing with a specific slope stability issue, it’s often best to consult with a geotechnical engineer who can provide tailored advice and solutions based on your situation.
EASY STEPS TO SECURE YOUR STRUCTURE
Constructing a safe structure requires specialized geotechnical work. Follow these steps to get started
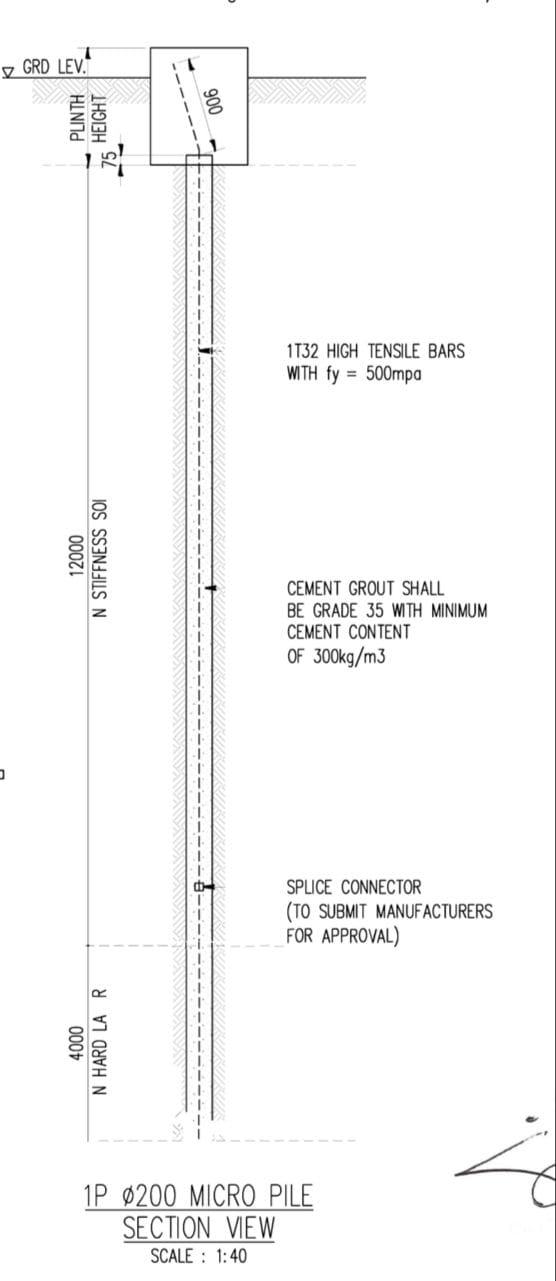



Get in Touch
If you’re facing a unique geotechnical challenge, Uni Excel Engineering Sdn Bhd (Micropile Contractor), is here to help. Contact us today to discuss your project and explore how we can provide effective, innovative solutions tailored to your needs
Phone
Visit us
or you can just fill in this contact form

Specialized in Geotechnical Works
Uni Excel Engineering Sdn Bhd is a company based in Malaysia registered with MOF and CIDB that specializes contractor (small to medium size) in geotechnical engineering, slope protection, and civil engineering services. We provide solutions for slope stabilization, erosion control, and site development, often focusing on sustainable practices and innovative engineering techniques.
OUR LOCATION
(199901012104/487004-A)
16-1(A5) Jalan Danau Lumayan 1
Off Jalan Tasik Permaisuri 1
Bandar Tun Razak
56000 Kuala Lumpur
Email: [email protected]
Direct Line: 013-6000 101